New Cork Handles Review - Bricklayers Trowel

Cork Handle Brick trowel Marshalltown W.Rose duracork review


In the world of Masonry new innovations are are slow and far between. So when something new comes along I jump at the opportunity to try it out.

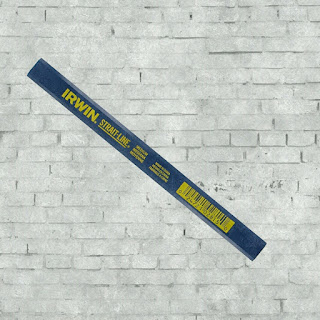
A new material is now being used for brick trowel handles - a composite Cork blend. The interesting thing is that both Marshalltown and W.Rose (Kraft tools), the heavy weights in the brick trowel industry, have released a whole lineup of them for their premier brick trowels. Both released their range in 2019.


Marshalltown call theirs the DuraCork Handle and W.Rose the Elite Series Cork Handle.

Marshalltown and W. Rose Cork Handle ad

I have used many handle types over the years but the two I have settled on is Marshalltowns DuraSoft and W.Rose ProForm, both of them are the soft grip options. For more on the Two Brick Trowels I'm currently using See Here.

Now when it comes to fishing rods however I'll take the cork handles over synthetics any day, so I'm looking forward to giving the two cork handled Bricklayers Trowels ago.


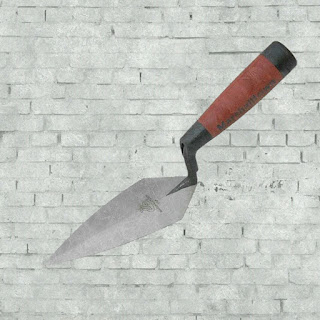
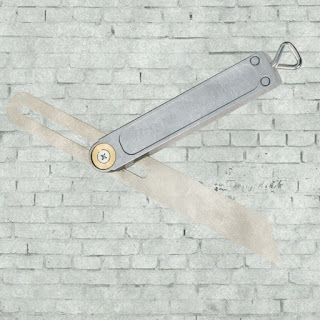
Marshalltown and W. Rose Cork handles Review


So you know I haven't purchased the Marshalltown DuraCork or the W. Rose Elite Series Cork Handle trowels yet, but as it happens I know some fellow bricklayers that have. After a good few hours of laying with both of them, here are my thoughts.


"My next trowel will have a Cork handle"


The blade construction, balance and shank angle of both the W.Rose and Marshalltown are the same as their other trowels. If they are a bit different to what I currently using, I didn't notice.

To be honest I was skeptical at first about the cork handles, thinking they would be a bit delicate on a brick trowel. However what I've seen of both trowel brands so far has really impressed.


Why use a Brick Trowel with a cork handle?


  • Comfort
  • Grip
  • Shockproof
  • Dust-proof
  • Durable
  • Waterproof

Comfort

Being made with cork, the handles have a natural softness, making them easy to hold and ergonomic. They are designed to be used comfortably all day with no chafing despite the grip. The W.Rose seems slightly wider and the Marshalltown longer.

Grip

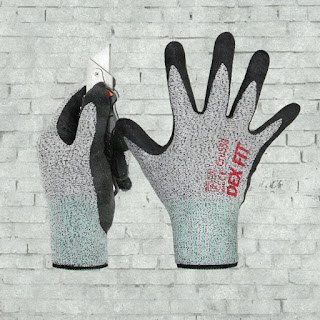
One of the strongest attributes of the cork handles is the grip they provide. When using gloves on other handle types like the plastic and soft grip handles it can be a bit slippery, especially when things are wet. The new cork handles provide excellent grip no matter how wet it gets, gloves or no gloves.

Shockproof

The trowels handles are designed to resist vibrations. Cutting or tapping bricks can be done with limited fatigue. This would be good for anyone struggling with elbow or wrist injuries.

Dust-proof

The handles don't absorb dust, so they won't stain and are easily cleaned. At the end of the day I checked the performance of both the Marshalltown and the W. Rose and they cleaned up like new.

Durable

This one is obviously a little harder to test without time but both companies have advertised the durability of their new trowel handles. Both have heavy-duty urethane end caps for further protection. I'm sure there are still many bricklayers that still use the end of their trowel handle to hit bricks and all sorts of things.

Waterproof

The cork has natural waterproofing properties meaning it sheds water rather than soaking it up. So the new cork handles dry faster, leading to better grip and durability.


Available Cork Handle Options:


Marshalltown DuraCork Handle


Click here to see the Price

London Pattern - Sizes: 9" 9.5" 10" 10.5" 11" 11.5" 12" 13"
Wide London Pattern - Sizes: 10.5" 11" 12"
Philadelphia Pattern - Sizes: 9.5" 10" 10.5" 11" 11.5" 12"


W.Rose Elite Series Cork Handle


Narrow London Pattern - Sizes: 9" 9.5" 10" 10.5" 11" 11.5" 12" 12.5" 13"
Wide London Pattern - Sizes: 9" 9.5" 10" 10.5" 11" 11.5" 12" 12.5" 13"
Philadelphia Pattern - Sizes: 9" 9.5" 10" 10.5" 11" 11.5" 12" 12.5" 13"
* Also comes in the Limber option giving more flexibility to the blade.


Trowel Brick Handle types Bricklaying wood cork soft grip leather

Handle types:


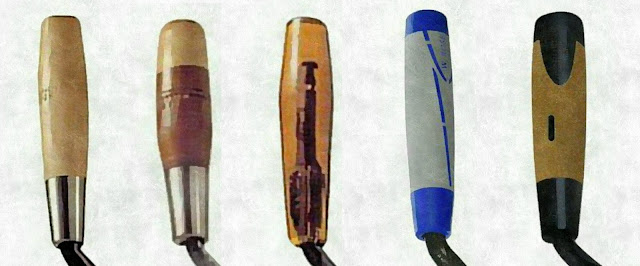
There are now five main types of brick trowel handles:
  • Wood
  • Leather
  • Plastic
  • Soft Grips
  • Composite Cork (New)

For more information on trowel materials and patterns see the article on what type of bricklaying trowel should I buy?


Wood Handles:

The most traditional of brick trowel handles. It wears really well, but is not the most comfortable or ergonomic. They do have a tendency to split when they get wet often.


Leather Handles:

Very traditional and good looking handles, if I ever bought a ceremonial brick trowel it would have a leather handle. They are comfortable but do need to be cared for properly. Many W. Rose users have the leather handles.


Plastic Handles:

An uncommon choice for a professional bricklayer. They have excellent durability. However they are very uncomfortable and can be slippery to use, especially when it's wet.


Soft Grip Handles:

They are the most common handle these days and are often given a slick trademarked name. They are comfortable handles and give you great grip if you wear gloves. They do wear out if the handle is used for knocking bricks or levels.


Composite Cork Handles:

The newest of the brick trowel handles. They are very comfortable to use and provide excellent grip for the bricklayer. My new recommended choice for bricklaying.

If you are about to start an apprenticeship have a look at this article on how to put together your first tool kit.


Efflorescence - What are the White Stains on my Bricks?

Efflorescence white stains powder on bricks masonry concrete blocks what are they


Do your clay bricks or concrete blocks have white powdery stains weeping out of them? This is a common problem known as Efflorescence. Here is a simple guide to understanding how efflorescence works, how to clean it off masonry and how to fix any underlying problems to stop it returning.

You can recognize efflorescence because it will disappear while the masonry wall is wet and then reappear as it dries. Also when you scratch it off the wall it becomes a powder like substance, this makes it easy to differentiate from organic staining like mold.

Key questions answered:

  • What is efflorescence and why does it happen?
  • How does Water travel to the face of brickwork?
  • Can you get rid of Efflorescence from Bricks?
  • Where does the water come from?
  • Will the Efflorescence go away on it's own?
  • How do you clean off Efflorescence from masonry?
  • How do you prevent Efflorescence becoming a problem?

What is efflorescence and why does it appear on Masonry?


Efflorescence put simply is salt that has been carried to the surface of masonry by water. Salts are found in cement, and also clay bricks. When water travels through the masonry, it carries the salt to the surface. The water then drys up leaving the white salt stain.

Salts found in Cement and Mortar:


  • Potassium Carbonate
  • Sodium Carbonate
  • Calcium Carbonate

Salts found in Clay Brick:


  • Calcium Sulfate
  • Vanadyl Sulfate
  • Maganese Oxide

These salts are soluble, meaning they dissolve when in contact with water and are held in the water.

Think about what happens to sugar after you have stirred it into a cup of tea. The sugar is still in the tea but it has dissolved. This is because sugar is made up of salts that are soluble.


Why does the water travel or migrate to the surface of the brickwork?

Water loves to travel, also called wicking through capillary action. This is because it is always trying to reach a state of equilibrium.

For example imagine one half of a brick was wet and the other half was dry. The moisture from the wet side will be pulled over into the dry side as water is trying to achieve a balanced saturation.

Water moisture wicking capillary action equilibrium in bricks block concrete masonry

This time imagine the whole brick is saturated. Because it is already in equilibrium the water has no where to travel. However if you were to use a hair dryer on the face side of the brick it will start to evaporate the water. 
As soon as the face side becomes less saturated than the rest of the brick the water will start traveling there to reach equilibrium.

Water moisture wicking capillary action equilibrium in bricks block concrete masonry face of brickwork


This last scenario is normally what happens on a brick wall. Because the face side of the wall will receive the sun and air movement, any water held in the bricks or behind them will start to travel to the face as it drys. Picking up the salts and transporting them there as well.


Can you get Rid of Efflorescence on Brickwork?


Yes you can.

Efflorescence depends on 3 Conditions:

  1. Soluble Salts in the brickwork
  2. Water in the brickwork
  3. The ability for the water to travel
That being said there is only one condition you need to worry about, the Water build up in the brickwork. The other two can't be easily changed.


Where does the water come from?

If your brickwork has a problem with efflorescence this is the most important question you can ask.

The water can come from many sources. Here are some of the most common places you should investigate:

  1. Rain / Snow Melt
  2. Leaking Pipe
  3. Leaking Flashing
  4. Brick were Wet when Laid
  5. Masonry contact with the Ground
  6. Masonry contact with Concrete Reinforcement

1)  Rain / Melting Snow


If you get a lot of rain or snow melt in your area, the masonry could absorb the water. Check if the area of brickwork that has the efflorescence marks is a somewhere that gets hit by a lot of rain. Normally on a house this will only be on one or two sides and will be lower on the wall. Any bricks that have exposed core holes and can fill with water are also prone to efflorescence.


2)  Leaking Pipe


Sometimes water pipes can get small holes in them that will leak down the inside of your walls. This should be quite easy to recognize. The wet bricks will be a distinct patch on the wall and there should be additional water damage within the house.


3)  Leaking Flashing


If flashing are not fitted properly or have become damaged they can cause rain water to leak down the masonry. Check areas common for flashing failures, around windows and doors, also where brickwork becomes another cladding material.


4)  Bricks were Wet when Laid


Because bricks and blocks are porous, if they are left out in the weather before they are laid, they will hold a lot of water. Once they are in the wall the water will migrate out. The efflorescence will begin to show a few days after being laid and will normally affect large portions of the wall.


5)  Masonry is in Contact with the Ground


Soil can easily transfer moisture into masonry. Concrete cinder blocks are often used for building retaining walls. If the earth has been filled up hard against it with no waterproofing membrane, moisture will travel through. On a brick wall sometimes footings or foundations can be below ground level. Just make sure it's not in contact with the first course of bricks.


6)  Masonry Contact with Concrete Reinforcement Filling


Concrete fill used for reinforcing has high volumes of water in it. Cinder blocks commonly get filled with concrete as does some structural brickwork, for example brick pillars or piers. The water in the concrete filling can work it's way into the masonry.


How you fix your efflorescence problem will be based on you accurately identifying the source of water. If you are struggling to do so, I would recommend getting in a professional bricklayer to have a look.


Will the White Efflorescence Stains go away with Time?


This depends on the source of the water. If your masonry has just been built, chances are that the bricks were a bit wet and any efflorescence will disappear on it's own. It can take up to a year, however you can clean it off, see how below.

If you think the source of moisture is rain pooling, a leaking pipe or flashing, or masonry that is in contact with the ground, (in other words, water that will continue to get into the brickwork or masonry) efflorescence likely won't go away on it own. In fact even if you were to clean it off, it will return. It would be best to get a professional in to fix the underlying problem.


How to Clean off Efflorescence from Brickwork - DIY


If you don't want to wait for the efflorescence to disappear on it's own, you can get rid of the white staining yourself.

First of all have a go at dry scrubbing the efflorescence powder off. Often just a strong brush is enough to remove the salts from the surface of the brick. It also means no more water needs to be added to the wall.

If the efflorescence staining is more stubborn use Muriatic Acid (hydrochloric acid). 


Klean Strip Green - Muriatic Acid

Check out the Price here

Make sure you wear protective clothing, and dilute to the recommended ratio (normally around 30%). Brush the acid on to the wall with a hard brush and let it sit for 20 minutes. Next scrub a mildly diluted detergent over the wall to neutralize the acid, and then rinse well with a hose.


Bricklaying Tips to Stop Efflorescence becoming a problem

The best way to stop efflorescence forming, is to not let it develop in the first place. The bricklayer has the responsibility to do everything they can to mitigate efflorescence. Proper training is therefore essential. Here are a few things for a bricklayer to put in place.

Keep your bricks covered from the rain. This is probably the most important thing a bricklayer can do. If bricks or blocks are on the construction site on wrapped pallets, keep them wrapped until you need them. Keep your brick stacks covered overnight or when it's raining. Unfinished walls should have their tops covered so water doesn't get inside.

Having a few good tarpaulins is important.


12' x 25' Heavy Duty Poly Tarp


Any masonry fencing or pillars should have a proper capping to stop water getting in. Brick veneers need adequate ventilation and drainage. This will keep the cavity nice a dry.

If there is any chance water can transfer from the ground into the brickwork or masonry make sure you use a moisture barrier.

Putting into place these basics will minimize the risk of efflorescence developing on your bricks.


How to become a Bricklayer - Masonry Apprenticeships

How to become a bricklayer masonry apprentice


If you have decided that you want to Become a Bricklayer, How do you get into the Industry?

No doubt you will have more questions regarding the process of becoming a Mason:
  • Should you become a Labourer (Hod Carrier / Tender / Helper) before starting a Bricklaying Apprenticeship?
  • What are Masonry Companies looking for in new employees?
  • Do you even need to go through with a formal qualification and apprenticeship?
  • Is it a good idea to join a bricklayers union, or contact a bricklayers association?

Although the exact process is going to be different depending on where you live, many countries have similar pathways. In fact if you live in America, the UK, Canada, Australia or New Zealand options to becoming a qualified bricklayer are basically the same.

The most common and best way to train as a brick mason is through an apprenticeship program. This means you will get paid as you learn and have a skilled bricklayer oversee your training. In this article we will cover four paths you can take to secure your masonry apprenticeship and become a qualified bricklayer. We'll look at the benefits of each option so you can determine what will work best for you.

There our many good bricklayers out there that haven't gone through apprenticeship programs, however if you plan on making bricklaying your career, I would definitely recommend it. You will open up many more job opportunities and not need to worry as the building industry tightens up its licensing.

Four Paths to become an Apprentice Bricklayer:

  1. Take a Job as a Bricklayers Labourer
  2. Straight through a Bricklaying Company
  3. Take a Pre Apprenticeship or Gateway Course at a Technical College
  4. Join a Trade Union or Contact a Bricklayers Association

Old school vintage bricklayers labourer hod carrier

1) Take a Job as a Bricklayers Labourer


Labourers are also called hod carriers, tenders or helpers depending on which country you are from. No matter what you call it laboring for a Bricklaying company is going to be really hard work. The good news is there will be a lot of work available, as good laborers are hard to hold on to. If you can show that you are willing to work hard without complaining, many masonry companies will take you on with no previous qualifications or experience.


Starting off as a labourer will teach you many useful skills for end goal of becoming a Mason. You will learn how to make the perfect brew of mortar, cut bricks and blocks safely, how to setup mortar boards and brick stacks and tool the mortar joints. It will thicken your skin and teach you how to follow instructions.

Perhaps more importantly, starting as a labourer will get you into the industry. You will be employed by a masonry company and be able to build a good relationship will with the boss and the rest of the team. You could even begin to make contacts with other bricklaying businesses in your area.

The real risk however is becoming stuck as a labourer. Because it is so hard to find good hood carriers, company owners can be hesitant to push ones on to learning to lay masonry. Even if a labourer has many years of experience, it doesn't directly translate into laying bricks and blocks well. You might see how it's done, but your training won't begin until you are on the trowel.

There are ways to avoid this eventuality. Make sure early on you express your desire to start a masonry apprenticeship. If the boss knows early on, it will give time to plan for it, perhaps finding a replacement for your laboring position. During break times ask the brickies if you can practice a bit, ask them for some Bricklaying Tips to help you Improve. If you get the feeling that you are going to get stuck as a labourer, don't be scared to move on to another company. With your labouring experience it will become a bit easier to pick up an apprenticeship with someone else.

So do you need to be a labourer before starting a bricklaying apprenticeship?

You certainly don't need to, but it will help you get use to construction sites and teach you the theory of bricklaying. Just be sure to set a time limit for being a labourer, perhaps a year.


2) Straight through a Bricklaying Company


Unless you already know a contractor it can be hard to pick up an apprenticeship from cold. Especially with zero experience. That being said, it is possible.

Many masonry jobs advertised online or elsewhere will be for experienced bricklayers. If you do see one offering an apprenticeship jump at it. Most likely though you will have to search for a list of masonry companies in your area and cold call them.

If you have no masonry experience, having completed your high school certificate or equivalent will be helpful. Especially if you have done well in classes such as mathematics, hard materials design technology or technical drawing.


When speaking with the owner of a masonry business, there are a number of things to keep in mind.

Because an Apprentice will normally loose money for the first year and then only break even for the second year, it's important to show that you are in it for the long haul. Make known that bricklaying apprenticeship is something you really want to do, it's not just a snap decision.

Employers will be looking for someone that is willing to work hard and someone that can listen to and follow instructions. One reason employers may favor an apprentice bricklayer over someone already qualified is they have the opportunity to train them the way they want to. So show your eagerness to learn.

Being physically fit might help convince a boss you can handle the work. You could even buy a Few personal Hand Tools to show you are serious about becoming a bricklayer.

If you manage to get employed with a boss happy to take you on as an apprentice, it would have to be the fastest way to become qualified as a brick and block mason.

3) Take a Pre Apprenticeship or Gateway Course at a Technical College


It could be that you struggle to find a company willing to take you on with no trowel skills. An option you have is to take a pre-apprenticeship or gateway course.

These are normally short courses that are run by Technical Colleges. Most likely the same institutions that assess the certification of apprentice bricklayers.

The bricklaying class runs from a month up to a year depending on the school. I think the most valuable pre-trade courses run for about two months.

These programs will teach you bricklaying basics. They focus on teaching how to spread mortar, laying brick to a string line, building corners and returns. They will also give you an introduction to block work. The course is designed to provide an overview into bricklaying, so classes are made up mod a variety of attendees. Most will be wanting to progress into apprenticeships, but others will be DIY ers just looking for a bit of instruction for their home project.


Once you have completed your course it does make it easier to pick up an apprenticeship. Many of the colleges will now even assist you in that. They have good connections within the Industry.

From a bricklaying contractors point of view you will now be more valuable. Not so much because of your masonry skill, but because you have a good idea of what the job entails and you are still keen to go ahead.

These courses obviously have a cost associated with them, but at the end of the day it's worth if it helps you secure an apprenticeship.


4) Join a Trade Union or Contact a Bricklayers Association


Another route you may wish to think about is joining a bricklayers union. Whether or not you have a labor union for bricklayers or if they accept pre-apprentices will depend on where you live.

Once you have applied and been accepted, the union will place you as an apprentice with of their member companies. There are some benefits from joining a masonry union like good training programs and even scholarships on offer. The union will work with you to make sure you are happy with your training and make sure you get paid a fair wage.

If a supportive trade union is not available where you live, no doubt there will be a bricklayers association. Associations don't normally take applications for inspiring masons, however they do encourage their members to take on apprentices.

Try sending them an email just expressing your desire to start an apprenticeship, and ask if they know any contractors that are wanting to take someone on. The secretary of the trade association will receive your request and they will be able to contact many bricklayers. If you are nice and polite they should be happy to help out. 


What does a Bricklaying Apprenticeship Involve?


A typical apprenticeship will last about 3 or 4 years. Some countries will set a certain amount of hours you must complete in the trade, like 8000 hours. Therefore how many years it takes to complete is dependent upon how much the apprentice works. Other countries set the amount of years needed.

Time to complete Bricklaying Apprenticeship

  • America: 3 years
  • UK Intermediate (Level 2): 2 years
  • UK Advanced (Level 3): 13-16 months
  • Australia: 4 years
  • New Zealand: 8000 hours (4 years)
  • Canada: 3 years

All apprenticeship programs will contain both classroom and on-the-job training. Obviously your company boss will supervise your work place training and then a bricklaying tutor will take take you through the classroom curriculum.

In a year you will spend around 2 to 3 weeks in the classroom. The testing and exams at the trade college will match your experience gained from being on the job. As you get closer to graduation the tutors will want to make sure you are competent in all aspects of masonry. Expect to be building arches, fireplace surrounds and backs, reading plans or blueprints and understanding bricklaying standards and codes for your area.

Completion of your apprenticeship will normally come with an official certification. This certificate can open up more opportunities.


Career Paths after Completion of your Bricklaying Apprenticeship


Don't expect promotions straight after completion of your apprenticeship. With only 3 or 4 years under your belt you will still be relatively inexperienced. As you gain experience and skill however you could be used for apprentice training yourself. If you have good management qualities you can progress to site supervisor or foreman.

Probably the ultimate goal for a bricklayer is to become self employed, starting a company. Controlling a business allows you to move into specialized fields of masonry, for example, heritage and restoration work or stone masonry.


Bricklaying Tool List - The Best Tools for an Apprentice Bricklayer


This is a list of the ultimate tool setup for a beginner bricklayer. The best bricklaying tools you can buy and why you need to have them in your kit.

Are you starting a new bricklaying apprenticeship and needing to put together your first toolkit. Wondering what hand tools you will need before arriving at site or college? What sizes to get? And what brands to buy?

First thing you need to know is bricklayers are very proud of their tools. They normally stick with tools brands they know and trust. If you buy good quality gear and look after it, your tools will last ages. Remember the quality and condition of a bricklayers tools is a good indication of their work and attitude.


There are some great tool making companies that specialize in bricklaying tools. Many of them do sell ready made apprentice kits. However I wouldn't recommend these kits for a few reasons.

Firstly I haven't seen one with the right masonry tools you will need. They miss some of the must have tools but then add random stuff you don't need, (margin trowels?) Another reason is you want to select the best brand for the tool you need rather than just sticking to one brand.

In the following list, I give my picks for the best bricklaying tools you can get. As you progress through your apprenticeship and bricklaying career, no doubt you will find tools that suit your personal taste and style. Also you will need to eventually buy a few more hand tools for more specific work, these are not used so frequently. The tool list here is a safe start. It will focus on the most common bricklaying tools, so you are able to put together a basic tool kit.

I'll try to stick to tools that are friendly for a beginner bricklayer and are easily picked up in America, Canada, the UK and Australia. Although I will try to recommend only one brand of tool, there maybe good alternatives worth checking out.

Start Up Bricklayers Tool List


1)  Toolbox - Dewalt Tough System Extra Large (DS400)


Toolbox - Dewalt Tough System Extra Large (DS400)


Check out more details and the Price here

Let's start with how you'll keep all your tools together. The traditional way is in a tool bag or just a bucket. I think having a proper Toolbox is the way to go though. It easy to organize and keeps your tools secure and dry.

The Extra Large Dewalt Tool Box is the perfect box.
  • Height 410mm 16 1/8 inches
  • Length 554mm 21 3/4 inches
  • Width 366mm 14 3/8 inches
It's a strong and durable box. An awesome plus with the Dewalt Tought System is that it is modular, meaning in the future you can get more of them and they stack nicely together. It will easily carry all the the bricklayers tools on this list plus more, (except the spirit levels and square of course).

Alternatively:

If you really want something a little larger, go with another Dewalt box this time with wheels and part of the Tstak modular system.
DEWALT Tool Box with Wheels TSTAK Deep Box 


2) Brick Trowel - Marshalltown The Premier Line Philadelphia 10" DuraSoft


Brick Trowel - Marshalltown The Premier Line Philadelphia 10" DuraSoft


Check out more details and the Price here

The bricklayers most important tool is his brick trowel. To get one that feels right, you will need to consider four things:
  • Size of blade
  • Pattern of blade
  • Handle type
  • Brand of trowel

If you are a beginner bricklayer it will be best to start with a small trowel. Because the best trowels are made in America, the sizes are in inches. 9" and 10" are small trowels, 11" and 12" are medium trowels 13" and above are large trowels. Go with a 10 inch trowel as it will be easier to control. As you gain more experience you may opt for something larger especially if you lay a lot of block.

Two main blade patterns are the London and Philadelphia. A Philadelphia trowel enables more mortar to be loaded, since you are starting with a small 10 inch blade select the Philadelphia pattern. Have a look here for more information on brick trowel patterns.

The grip provided by the synthetic rubber handles are the best for an apprentice bricklayer.

When it come to selecting the trowel maker, there are only two real options. I give the edge slightly to Marshalltown, their trowels have great flexibility and weight balance.

With time you may want to look at picking up another brick trowel, one for bricklaying and one for laying blocks. Have a look at what I use here.

Update: You might want to consider checking out one of the new Cork handled Brick Trowels - See a review of the Marshalltown and W.Rose here.

Alternatively:


The other brand is W.Rose. Their premium brick trowel is a great choice. It's made super tough. Click here for a closer look at the many options for full tang brick trowel brands.


3) 48" 1200mm Spirit Level - Stabila Heavy Duty Type 196


48" 1200mm Spirit Level - Stabila Heavy Duty Type 196


Check out more details and the Price here

There really is only one level maker you should use, the German company Stabila. Although not always admitting it, bricklayers tend to be quite tough on their spirit levels. The Stabila is so well made it can take a lot of the abuse and still read true.

The 48" 1200mm Spirit Level is perfect for building up corners and making sure that the bricks run in line. This will be your most used level so get a good one. For information on the best levels to use for bricklaying see here.


4) 24" 600mm Spirit Level - Stabila Heavy Duty Type 196


24" 600mm Spirit Level - Stabila Heavy Duty Type 196


Check out more details and the Price here

It's definitely worth having a smaller spirit level for tight situations, where your main 48" 1200mm level can't fit. For my secondary level I have had different lengths over the years, but I have settled on the 24" 600mm length as it is the most versatile small level.

Again I would recommend Stabila for your smaller level. They do make the masonry padded version and the R-Beam in this size as well, but too be honest they are both a bit unnecessary. Just stick with the Heavy Duty Type 196, the one with the hand holes.


5) 10" 250mm Boat Level - Stabila 25100


10" 250mm Boat Level - Stabila 25100 torpedo


Check out more details and the Price here

The final Level you will need is a boat level also called a torpedo level. This very small spirit level will not be used all the time, but will be necessary for detailed work and solider courses. Most bricklaying colleges or pre-trade courses will get you to do this type of work so it would be best to have a boat level with you.


Because it's basically used for delicate work, you could definitely get away with buying a cheaper boat level. However if you want the best boat level, buy a Stabila again.


6) Brick Hammer - Estwing Bricklayers / Masons Hammer 20oz


Brick Hammer - Estwing Bricklayers / Masons Hammer 20oz


Check out more details and the Price here

It's pretty rare to cut bricks with a hammer these days, however a brick hammer gets used to tidy cuts that go a bit wrong with the bolster. If you purchase a brick hammer you could get away not having a claw hammer. Many bricklayers will use their brick hammer to drive in nails or even their line pins into a hard wall. There is a variation called a scutch hammer which has replaceable front teeth. Don't bother with these as you won't be using it as much as they did in the old days.

Like their claw hammers Estwing make a great brick hammer. It has good balance and stays sharp for a long time. Estwing has a good range of weights to choose from, there is no need to go to heavy, stick with one under 20 Ounces.

Alternatively:

Vaughan ABL18 18-Oz Bricklayers Hammer is another well balanced brick hammer.


7) Pointing Trowel - Marshalltown 6" The Premier Line


Pointing Trowel - Marshalltown 6" The Premier Line


Check out more details and the Price here

A pointing trowel looks just like a normal brick trowel only smaller, and it's made in the same way. You'll use your pointing trowel for multiple things, for struck and weathered jointing, for filling in joints, for spreading mortar in tight places, and for cleaning of hard mortar.

Most bricklayers will use the 6" pointing trowels, the smaller 4" and 5" ones are favored by archaeologists. Marshalltown pointing trowels are made to same high standard as their brick trowels.


8) 10mm 3/8 Flat Tuck Pointer - Marshalltown The Premier Line


10mm 3/8 Flat Tuck Pointer - Marshalltown The Premier Line


Check out more details and the Price here

The flat tuck pointers (sometimes called caulking trowels) are needed to smooth out and seal the mortar on raked joints. They can also be used to push mortar into empty holes in the brickwork. This is needed when you are doing brick repairs to a wall.

The pointers do get a lot use, so they will wear down, becoming smaller in width. The Marshalltown tuck pointers have been the most durable I've used. Wooden handles would be most common but the DuraSoft handles are really nice to use.


9) 8mm 5/16 Flat Tuck Pointer - Marshalltown The Premier Line


8mm 5/16 Flat Tuck Pointer - Marshalltown The Premier Line


Check out more details and the Price here

You will eventually need different sizes of tuck pointers. Two important size widths to get straight away are the 10mm 3/8" and the 8mm 5/16". These two Marshalltown Pointers should cover most situations during your apprenticeship.


10) Barrel Jointer - Hubbard Barrel Jointer


Barrel Jointer - Hubbard Barrel Jointer


Check out more details and the Price here

The concave joint is a main joint type in block and brick masonry. It's commonly done with a half round "S" bend jointer. However I recently switched to a barrel jointer and feel it leaves a cleaner finish.

Hubbard have specialized in jointers for 50 years. If you ask around some brickies have had their Hubbard jointers for over 30 years, they last forever. Their barrels come in 4 interchangeable sizes, 1/2″ 13mm, 5/8″ 16mm, 3/4″ 19mm, 7/8″ 22mm, so no matter the joint size, you'll have the right diameter half round.

Alternatively:

If you can't get your hands on a Hubbard try the Amtech G1700 Jointer.


11) Chariot Raker - OX Tools Poly Wheel


Chariot Raker - OX Tools Poly Wheel


Check out more details and the Price here

Again a tool with multiple names depending on where you live: 
  • Chariot Raker
  • Roller Raker
  • Wheel Raker
  • Skate Raker
  • Joint Raker
Whatever you want to call it, you'll need one to rake out joints to a set depth.

The Ox raker might be a little controversial as it has poly wheels on it. By far the majority of rakers have aluminum or steel wheels. However I find the poly wheeled raker so much better to use, they roll nicely on the brick and don't make noise. My one has lasted years 8 years now and still going strong.

I did notice it gets some bad reviews however keep in mind many DIY'ers buy these rakers thinking they will be able to clean out mortar joints that are 30 years old, no wonder the nail doesn't last one day. Rakers do not scrape out hard mortar joints.


12) Builders Square - Irwin framing square 24" × 16"


Builders Square - Irwin framing square 24" × 16"


Check out more details and the Price here

A builders square or set square is vital for building brick pillars and setting out returns. It helps you mark out cuts that must stay square.

It's not too important which square you get, however the Irwin framing square is a good one. It's aluminum so it doesn't rust and is light. The high visibility markings are great to read.


13) Soft Brush - Marshalltown Masonry Brush Beaver Tail


Soft Brush - Marshalltown Masonry Brush Beaver Tail


Check out more details and the Price here

Having a soft brush will help you put the finishing touches on your brickwork. After jointing a light brush will clean off the small dags that form on the edges.

To keep this process fast, don't get a small paint brush style brush. Go for one that is a long as possible and has a handle that won't scrape your knuckles. The Marshalltown beaver tail brush is a great choice.


14) Steel Rule - Mitutoyo 182-126 Steel Rule 12"/300mm


Steel Rule - Mitutoyo 182-126 Steel Rule 12"/300mm


Check out more details and the Price here

A steel rule is good for mark bricks that need to be cut, you can mark with a tape measure of course, but the reason I will use a rule is because it's not damaged by water. If you need to remark after using a wet saw or even if it starts raining, a rule will get wet but it doesn't matter.

Mitutoyo is an old Japanese company that has been around for ages. Their stainless steel rules are used extensively in the engineering industry. They are a great addition to your toolkit.


15) Tape Measure 10m 33 foot- Komelon High-Visibility Professional Tape


10m 33 foot Tape Measure - Komelon High-Visibility Professional Tape


Check out more details and the Price here

With your steel rule dedicated to measuring cuts to the bricks and blocks, you can look after your tape measure. It probably will need to be replaced every few years still as gets used often to measure the length and height of walls, mark gauge rods and the like.

You don't really want a tape measure to be longer than 10m 33 foot it's too big and bulky, for longer setting out measurements it's better to have the manual wind up style tape.

The Komelon High-Visibility Tape Measure is very well made and easy to read. Don't buy one that has both millimetres and inches, that just renders one side of your useless for the majority of the time.

Alternatively:

Another great tape measure to check out is the Stanley Fatmax Auto-Lock Tape Rule.


16) Sliding T Bevel - Shinwa 8" Blade


Sliding T Bevel - Shinwa 8" Blade


Check out more details and the Price here

A sliding T bevel won't be used too often but you will need to buy one early. Many of the detailed projects made at a bricklayers college or pre-trade course will require a bevel to accurately mark angled cuts.

Shinwa is another Japanese company that makes great measuring equipment. Their aluminum and stainless steel sliding bevels don't break or warp like the cheap plastic ones. And once it's tighten up it stays locked in place.


17) Pencils - Irwin Carpenter Pencil Medium Lead


Pencils - Irwin Carpenter Pencil Medium Lead


Check out more details and the Price here

A good set of pencils are a must for being able to cut and setup brick walls accurately.

The Irwin Pencils work really well on masonry, they can be sharpened to a nice point and then hold their sharpness longer than other pencil brands I've used. Even if you sharpen the lead quite long it doesn't break.


18) Utility Knife - Tajima Rock Hard Snap Knife


Utility Knife - Tajima Rock Hard Snap knife


Check out more details and the Price here

You have to be able to keep your pencils sharp and open up packages of bricks and blocks. Having a good sliding knife on you is really handy.

The Tajima Rock Hard series have cheap replacement blades that are easy to put in. The knife is a great comfortable size and cuts well.


19) Line Pins - Footprint 6"


Line Pins - Footprint 6"


Check out more details and the Price here

Line pins fix the string line between two brick corners. They are most commonly used on existing brickwork were repairs need to be done. The pins are driven into the hard mortar with a hammer.

Because the pins need to be driven into hard mortar you do need pins that are tough. The Footprint line pins are the way to go. Trusted by bricklayers all over the world they are basically indestructible.


20) String Line - OX Builders Line


String Line - OX Builders Line


Check out more details and the Price here

A string line used to lay bricks and blocks needs to be strong. They get pulled tight to remove any sag from the line. When they do break it's best not to try and tie them together again.

The new Ox cyan lines have surprisingly good contrast. But the real reason like these lines is that they are super thin and still really strong. With a thin string line it makes it easier for beginner bricklayers to keep laid bricks off it.


21) Line Blocks - OX Rubber Line Blocks


Line Blocks - OX Rubber Line Blocks


Check out more details and the Price here

The line blocks hold the string line to a brick corner or a profile. Wooden ones are cheaper but they do break. Be careful with smaller blocks which can put a lot of pressure on a freshly built corners.


Not simply to match the blue Ox string line, I really like the Ox rubber line blocks. They are strong, are the perfect size and have really good grip.


22) Club Hammer - Estwing 3-Pound


Club Hammer - Estwing 3-Pound


Check out more details and the Price here

You will need a club or lump hammer to use with your bolsters and chisels. A lighter hammer for this purpose will be fine, however there will be times were a heavier hammer is beneficial, such as driving in steel reinforcing bar. A great balance is the 3 pound club hammer.

There are many companies that make adequate club hammers. But when it comes to hammers I always favor Estwing. It has a comfortable handle designed for long periods of use.


23) Brick Bolster - Footprint Bolster 100mm (4in)


Brick Bolster - Footprint Bolster 100mm (4in)


Check out more details and the Price here

Most new bricks will be cut with a brick saw. However old recycled bricks or bricks that don't require a high level finish typically get cut with a hammer and bolster. The 100mm 4" bolster is the most common size, it has a lot of weight behind it to give a nice clean cut and it's wide enough to cover most bricks.

I have used many bolsters that pack up quickly. It is worth getting the best. I recommend the Footprint Bolsters, like their line pins they are high quality.


24) Scrub Brush - Carlisle Sparta Spectrum Utility Brush


Scrub Brush - Carlisle Sparta Spectrum Utility Scrub Brush


Check out more details and the Price here

A scrub brush will last you a few years before you need to replace it. I know there are many brickies that won't clean their gear until the next day, but I think it's best at the end of the day. I do use water on most of my tools, scrubbing off the mortar, then any of my carbon steel tools like my brick trowel and pointers I will dry off with a rag. If you ever need to use a brush with acid this type works well, especially for efflorescence removal. 

The Carlisle Sparta scrub brush has nice long bristles that a firm enough for a quick clean.


25) Earmuffs - 3m Peltor 4xa


Earmuffs - 3m Peltor 4xa


Check out more details and the Price here

For any power tool use even hammering make sure you have good hearing protection. Most commercial sites will require hard hats so it's worth having a pair of clip-on ear muffs. But having an over head pair is also needed for when you are not wearing your hard hat.

The 3m peltor 4xa ear muffs have a noise reduction rating (NRR) of 27 dB for moderate to high noise exposures. They are lightweight and have a slim-profile making them easy to wear for long periods.


26) Safety Glasses - No Cry Safety Glasses


Safety Glasses - No Cry Safety Glasses


Check out more details and the Price here

You will also need a good pair of safety glasses when cutting, hammering or using other power tools. Get clear ones rather than tinted so you can see clearly with you loose light.

The No Cry Safety Glasses are anti-fog and scratch resistant making them perfect for the rigours of bricklaying.


27) Gloves - Dex Fit Level 5 Cut Resistant Gloves


Gloves - Dex Fit Level 5 Cut Resistant Gloves


Check out more details and the Price here

Gloves are certainly not a necessary part of a bricklayers Tool kit, however for someone that has had too much experience laying brick it is a good idea to look after your hands. Your hands do toughen with time but there are certain brick types that its always best to wear gloves for.

Dex Fit Gloves are nice and thin giving good movement and feeling but still provide the needed protection for a brick mason.


Bricklaying Tool List - the Apprentices Ultimate Guide

  1. Toolbox - Dewalt Tough System Extra Large (DS400)
  2. Brick Trowel - Marshalltown The Premier Line Philadelphia 10" DuraSoft 
  3. Spirit Level 48" 1200mm - Stabila Heavy Duty Type 196
  4. Spirit Level 24" 600mm - Stabila Heavy Duty Type 196
  5. Boat Level 10" 250mm - Stabila 25100
  6. Brick Hammer - Estwing 20oz
  7. Pointing Trowel - Marshalltown 6" The Premier Line
  8. Tuck Pointer 10mm 3/8 - Marshalltown The Premier Line
  9. Tuck Pointer 8mm 5/16 - Marshalltown The Premier Line
  10. Barrel Jointer - Hubbard Barrel Jointer
  11. Chariot Raker - OX Tools Poly Wheel
  12. Builders Square - Irwin framing square 24" × 16"
  13. Soft Brush - Marshalltown Masonry Brush Beaver Tail
  14. Steel Rule - Mitutoyo 182-126 Steel Rule 12"/300mm
  15. Tape Measure 10m 33" - Komelon High-Visibility Professional Tape
  16. Sliding T Bevel - Shinwa 8" Blade
  17. Pencils - Irwin Carpenter Pencil Medium Lead
  18. Utility Knife - Tajima Rock Hard Snap knife
  19. Line Pins - Footprint 6"
  20. String Line - OX Builders Line
  21. Line Blocks - OX Rubber Line Blocks
  22. Club Hammer - Estwing 3-Pound
  23. Brick Bolster - Footprint Bolster 100mm (4in)
  24. Scrub Brush - Carlisle Sparta Spectrum Utility Scrub Brush
  25. Earmuffs - 3m Peltor 4xa
  26. Safety Glasses - No Cry Safety Glasses
  27. Gloves - Dex Fit Level 5 Cut Resistant Gloves


This is the Tool List of bricklaying tools I would be using if I was starting my masonry apprenticeship again. It's not going to be perfect for everyone. As you gain experience you will start to work out what works for you. Hope this list is a good start for you though.

Find more Articles relating to the Best Bricklaying Tools here 


Or Articles to full of Bricklaying Tips and Techniques here