

So you have no experience bricklaying but you have been wondering whether that small brick project or repair is something you could tackle yourself.
Let me assure you that if you have a few basic building skills and the right tools, laying bricks is well within your grasp.
Now let's be clear any structural brickwork or decent sized job is best left to a professional bricklayer. However if you are planning a small retaining wall for your home garden, or maybe have a few bricks that need to come out and be replaced, an average DIY'er with the right instruction could do a good looking job.
Here a step by step guide to point you on the right direction.
Equipment
First up, make sure you have all the right products and tools before you begin. That includes enough bricks and mortar.How to calculate how many Bricks you will need
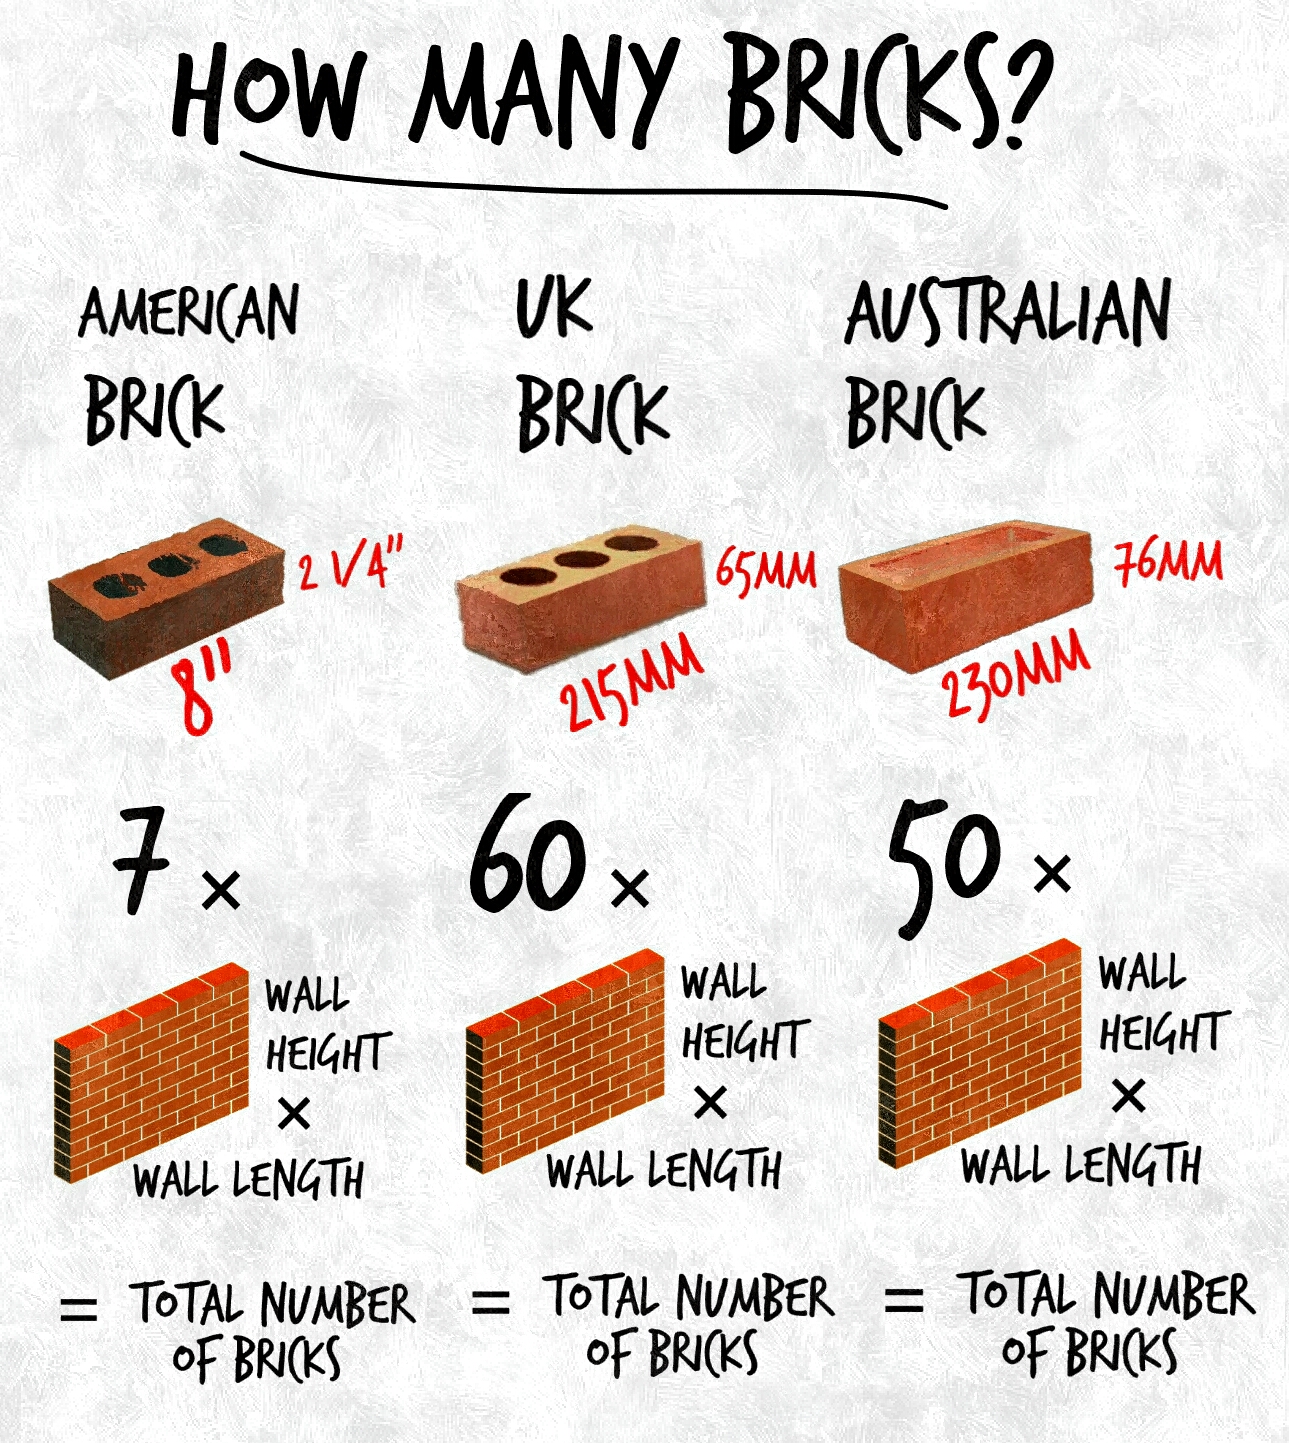
If you are using a standard brick size, the following information will help. All given measurements are firstly a brick's length and then height (width is not important for working out quantity).America standard brick (8" x 2 1/4")
7 bricks per square foot
Uk standard brick (215 x 65 mm)
60 bricks per square meter
Australia/ New Zealand standard brick (230 x 76 mm)
50 bricks per square meter
Measure the width of your wall, multiply it by the walls final height, and then multiply by square unit rate above.
For example if you are in America. Your wall was ten feet long and two feet high: 10 x 2 x 7 = 140 bricks
Or if you live in the UK and your wall was five meters long by one meter high: 5 x 1 x 60 = 300 bricks
Simple right, just remember to add a few on for breaks and cuts. Most brickies will add on 10 percent.
How much Mortar will I need?
Without the use of a proper mixer, I would definitely recommend using premixed dry mortar. Mixing sand and cement by hand can lead to weaknesses if it is not done well.Bags of premixed mortar come in various sizes, look for bags around 30kg (60lb) as they easy enough to handle. Most bags will have a yield rate printed on them but as a very rough guide, a 30kg (60lb) bag would normally lay about 25 standard bricks.
Minimum required Tools:
Brick Trowel
Just for a one off job a cheap trowel will do. If you are looking for something more permanent have a look at some great trowels here.
Click here to see on Amazon
Spirit Level
You will need a level to keep your wall coming up plumb. A good Spirit Level can get expensive however a really cheap one will likely not read true. Click here for a review of some good bricklaying Levels.
String Line
The only time you would not need a string line was if your wall curved the whole way. Any straight sections is worth stringing a line.
Click here to see on Amazon
Line Pins or Blocks
Needed to hold your string line up to the corners you build. It is possible to use large nails to do the trick.
Click here to see on Amazon
Jointer
There are normally three common ways to finish brickwork.1) Round / Concave
For a beginner bricklayer this joint type would be the easiest and can be forgiving to poorly laid bricks. A concave 'S' jointer is run through the mortar.

2) Raked
A raked joint would be the most common for a professional. It clearly shows the joint sizes so the bricks must be laid well. Two tools are need a brick joint raker and a flat tuck pointer
A raked joint would be the most common for a professional. It clearly shows the joint sizes so the bricks must be laid well. Two tools are need a brick joint raker and a flat tuck pointer


3) Struck / Weathered
Struck joints can look very good if done well however many first timers find it difficult to maintain a consistent angle. No extra tools are needed because it is done with your brick trowel.
Angle Grinder
A good 4 1/2" angle grinder would be the way to go for cutting bricks, especially if the bricks are new. Small angle grinders are nice and easy for a beginner to use. Older solid bricks could be cut with a hammer and Bolster but would not leave a clean cut finish. I would recommend staying away from a brick hammer for cutting.
Click here to see on Amazon

Wheelbarrow
For a one off home project using a wheelbarrow to mix up the mortar will be fine. If you didn't have a proper mortar board I would even keep the mixed mortar in there for laying the bricks rather than putting it in a bucket.
Click here to see on Amazon

How to make a Brick Wall - Step by Step
1) Foundation
Make sure you a solid concrete foundation or footing for your brickwork. The more level your foundation is the easier it will be for you to lay your bricks.2) Setup
If you can use a Set Square to mark on the foundation the corners of your wall. Then line up the first course of bricks (dry lay) to make sure they all fit nicely. If the joints between the bricks are too large or small consider adding a cut brick. This normally is placed next to a corner brick where it doesn't catch the eye. With your angle grinder make any cuts before mixing up your mortar.3) Mixing Mortar
In the wheel barrow mix up your mortar. I find it best to keep the dry powder and water separate in the barrow. Mix in a bit of the mortar with the water, gradually adding more. Add more water as needed but be careful not to add to much.A 30kg (60lb) bag of premixed mortar needs about 4 litres (4qt) of water.
Remember that mortar goes off quickly so if you don't have much experience laying bricks just start by mixing one bag.
4) Build Brick Corners
Begin by building up to corners. On the foundation spread enough mortar for about three bricks and then lay them in place. Use your Spirit Level to make sure the top of the bricks are level and that the front faces of the three bricks are straight. Do the same for the return bricks around the corner and then move up to the next course. As you get higher keep checking the corner for plumb. After 4 or 5 courses stop and build the second corner in the same way.5) Lay to the Line
Now the two corners are built, it's time to string a line between them. Use line pins or line blocks to do this, making sure the line is tight enough to avoid sagging. Spread out mortar for a few bricks and lay them. This time you want to adjust each brick as you lay it. Remember to keep it slightly off the line so you don't end up with a bow in your wall. Keep repeating this as you fill in the courses until the corners have been filled in. Repeat steps 4 and 5 until the final height of your wall is reached. Check out a few tips on how to improve your bricklaying technique.6) Jointing
Keep checking that the mortar in the earlier brickwork is not getting to hard to joint. When the jointer or trowel is run over the mortar, it should seal up, looking smooth.If it still looks porous after being struck, you have waited to long.
However if it looks sealed but there are wet ridges in it, you need to wait longer. The brick wall would likely benefit from a light brush to finish it off.
How to Replace Cracked Bricks
Another great DIY project is to cut out and replace any cracked bricks from an existing wall. Just be careful that the cracked bricks don't indicate a serious structural weakness. If the cracking goes down into the foundation, there maybe some major restoration work needed and it would be best handled by a professional. Before taking on this task , I would recommend a few more tools.
Additional equipment
Flat Tuck Pointer
Regardless of what type of final pointing you are trying match, a flat tuck pointer is needed to push mortar into the joint to hold the brick in place.Click here to see on Amazon
Bolster
Needed to break away the old bricks and then clean off the old mortar.
Click here to see on Amazon
Hammer
To be used with the bolster. Normally a club hammer is best for use with a bolster, however I find a claw hammer I great for delicately breaking up bricks that need to be removed.
Click here to see on Amazon

Steps for Brickwork Repair
1) Cut out Old Joints
Start by using your angle grinder to cut as much of the old mortar away. Start with the horizontal bed joints, and make sure you cut past the edge of the brick that needs to come out. Next cut the perpendicular joints as deep as you can being careful not to cut into any bricks below or above. Widen your cuts to remove as much old mortar as possible.2) How to Remove the Cracked Bricks
Use a claw hammer to smash a central brick. Once that brick has broken remove the pieces. This now gives you a hole in the wall to start removing other surrounding bricks that need to come out. Try using a combination of the bolster and hammer, and where you can hit the bricks sideways rather than into the wall. This minimizes the risk of loosening surrounding brickwork that doesn't need to come out.3) Remove all Old Mortar
Take your time to carefully clean off the old mortar using your bolster. Again try and hit sideways because hitting straight back risks blowing out the back of the surrounding bricks. Once it is all clean, dry lay your replacement bricks to make sure they fit.4) Mix up your New Mortar
Follow the the instructions above for mixing mortar. Sometimes colored oxide might need to be added to match the existing color.5) Butter and Lay your Bricks
The hardest brick to lay will be your last one. The best way to do it is to butter all edges of the brick and the remaining hole in the wall. The mortar should be swiped onto the brick like a wedge, thick on face side and almost nothing on the backside. Butter the hole like a wedge as well, but this time the back should be thick and the front thin. Lay the brick by holding on to the front edges and pressing it into the hole trying to keep it at the right height.6) Jointing
Use your flat tuck pointer to push in new mortar around the final bricks you have laid. This will strengthen them. Joint the brickwork in a way to match the existing.Do you enjoy Bricklaying and want to make it your career? Here is how to become a bricklayer.